The great C-41 stand development experiment, Part 1: Fuji Pro 400H and Fuji Superia 400
OnC-41 is tricky to do. Unlike black & white, there’s not much creative control and only one way to do it right. And it’s a little off-putting to people because to do it right, you need precise timing and temperature control.
Or do you?
A while back I read about this crazy idea of doing C-41 (color negative) stand development from the Lomography blog.
But let’s back up for a second and talk about stand development. This is a sort-of alternative development process typically used in black & white film development. The typical development process in black & white is to develop your negatives in a relatively-high concentration of developer for, say, something like 10 minutes, agitating every minute. Stand development on the other hand, subverts this almost entirely. There you use a much smaller ratio of developer-to-water (typically something like 1:100 or even 1:200), pour in the chemicals, and just let them sit there, for 30 minutes, an hour, or even two hours or longer.
Not only is this process dead simple, but with certain combinations of developers + film (most popular is Rodinal + Tri-X) you can get very cool results.
First, you end up with a very sharp image.
Second, (and this is much more interesting to me), you end up with an enormous exposure latitude. You can expose your film anywhere between 400 and 6400 ISO and get a usable image.
Back to C-41. Standard C-41 development is kind of an ordeal. You need to get your chemicals to 102° F and keep them there throughout the development process. For me, this means warming up the chemistry, and then using a cooler filled with water to keep the chemicals and tank at the correct temperature. It’s not particularly difficult once you get it down, but it’s still a more involved process than black & white development.
So just being able to simplify this process by doing a stand development would be pretty cool. But I was also curious to see if I could get an increased exposure latitude like I do with black & white film.
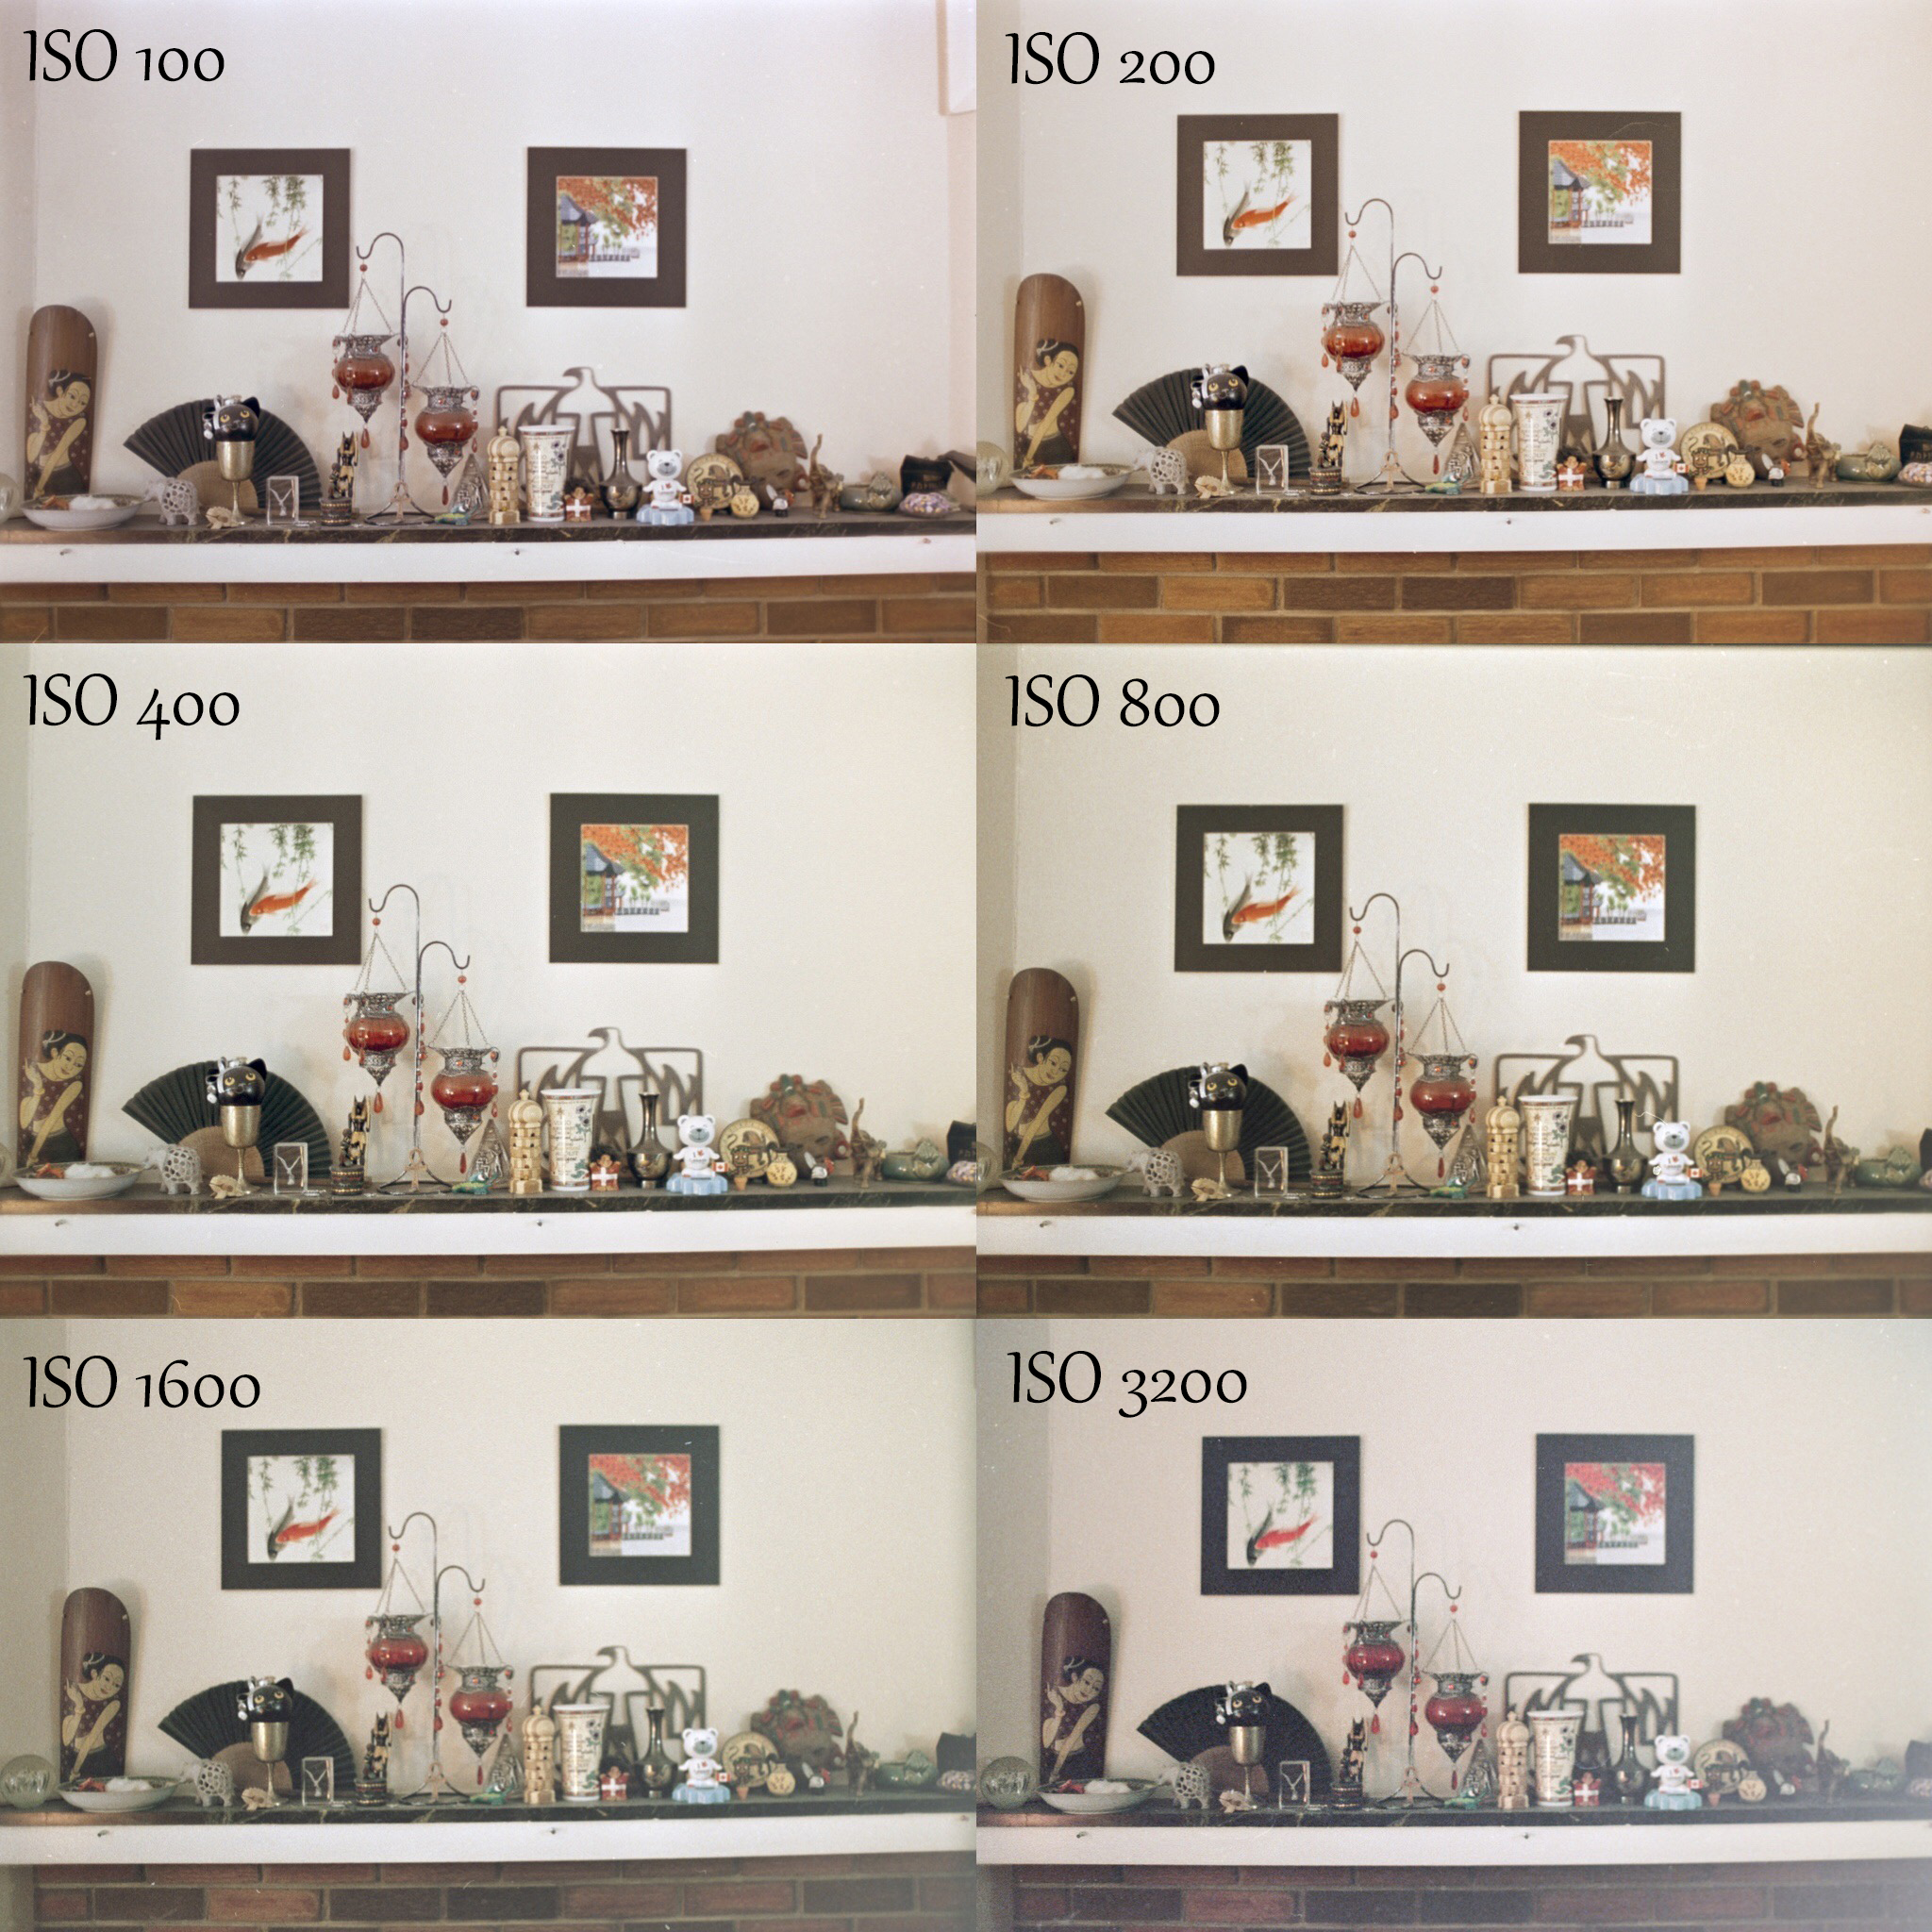
So I loaded a roll of Fuji Pro 400H in my Nikon F3 and took multiple pictures of two scenes, exposing for ISO 100, 200, 400, 800, 1600, 3200, and 6400.
The Lomography blog prescribed 45 minutes of development time at room temperature, plus another 45 minutes for the bleach and an unspecified amount of time for the fixer. I didn’t really know how to replicate the bleach + fixer step, because (1) the kit I’m using has a combined bleach + fixer (blix), and (2) the Lomography blog doesn’t specify the fixing time. So I simply did the blix step the standard way, by warming it up to approximately the right temperature (the blix temperature doesn’t need to be as precise) and blixing the film for 6.5 minutes.
The first set of images was a series of selfies taken outside. I metered for ISO 100 in front of my face with an incident light meter, and took shots in one-stop increments going from there.
Please note: none of these images are straight-out-of-scanner. I edited the first image as I normally would in my workflow, and then edited the others to match the tones and colours in the ISO 100 image as closely as possible.
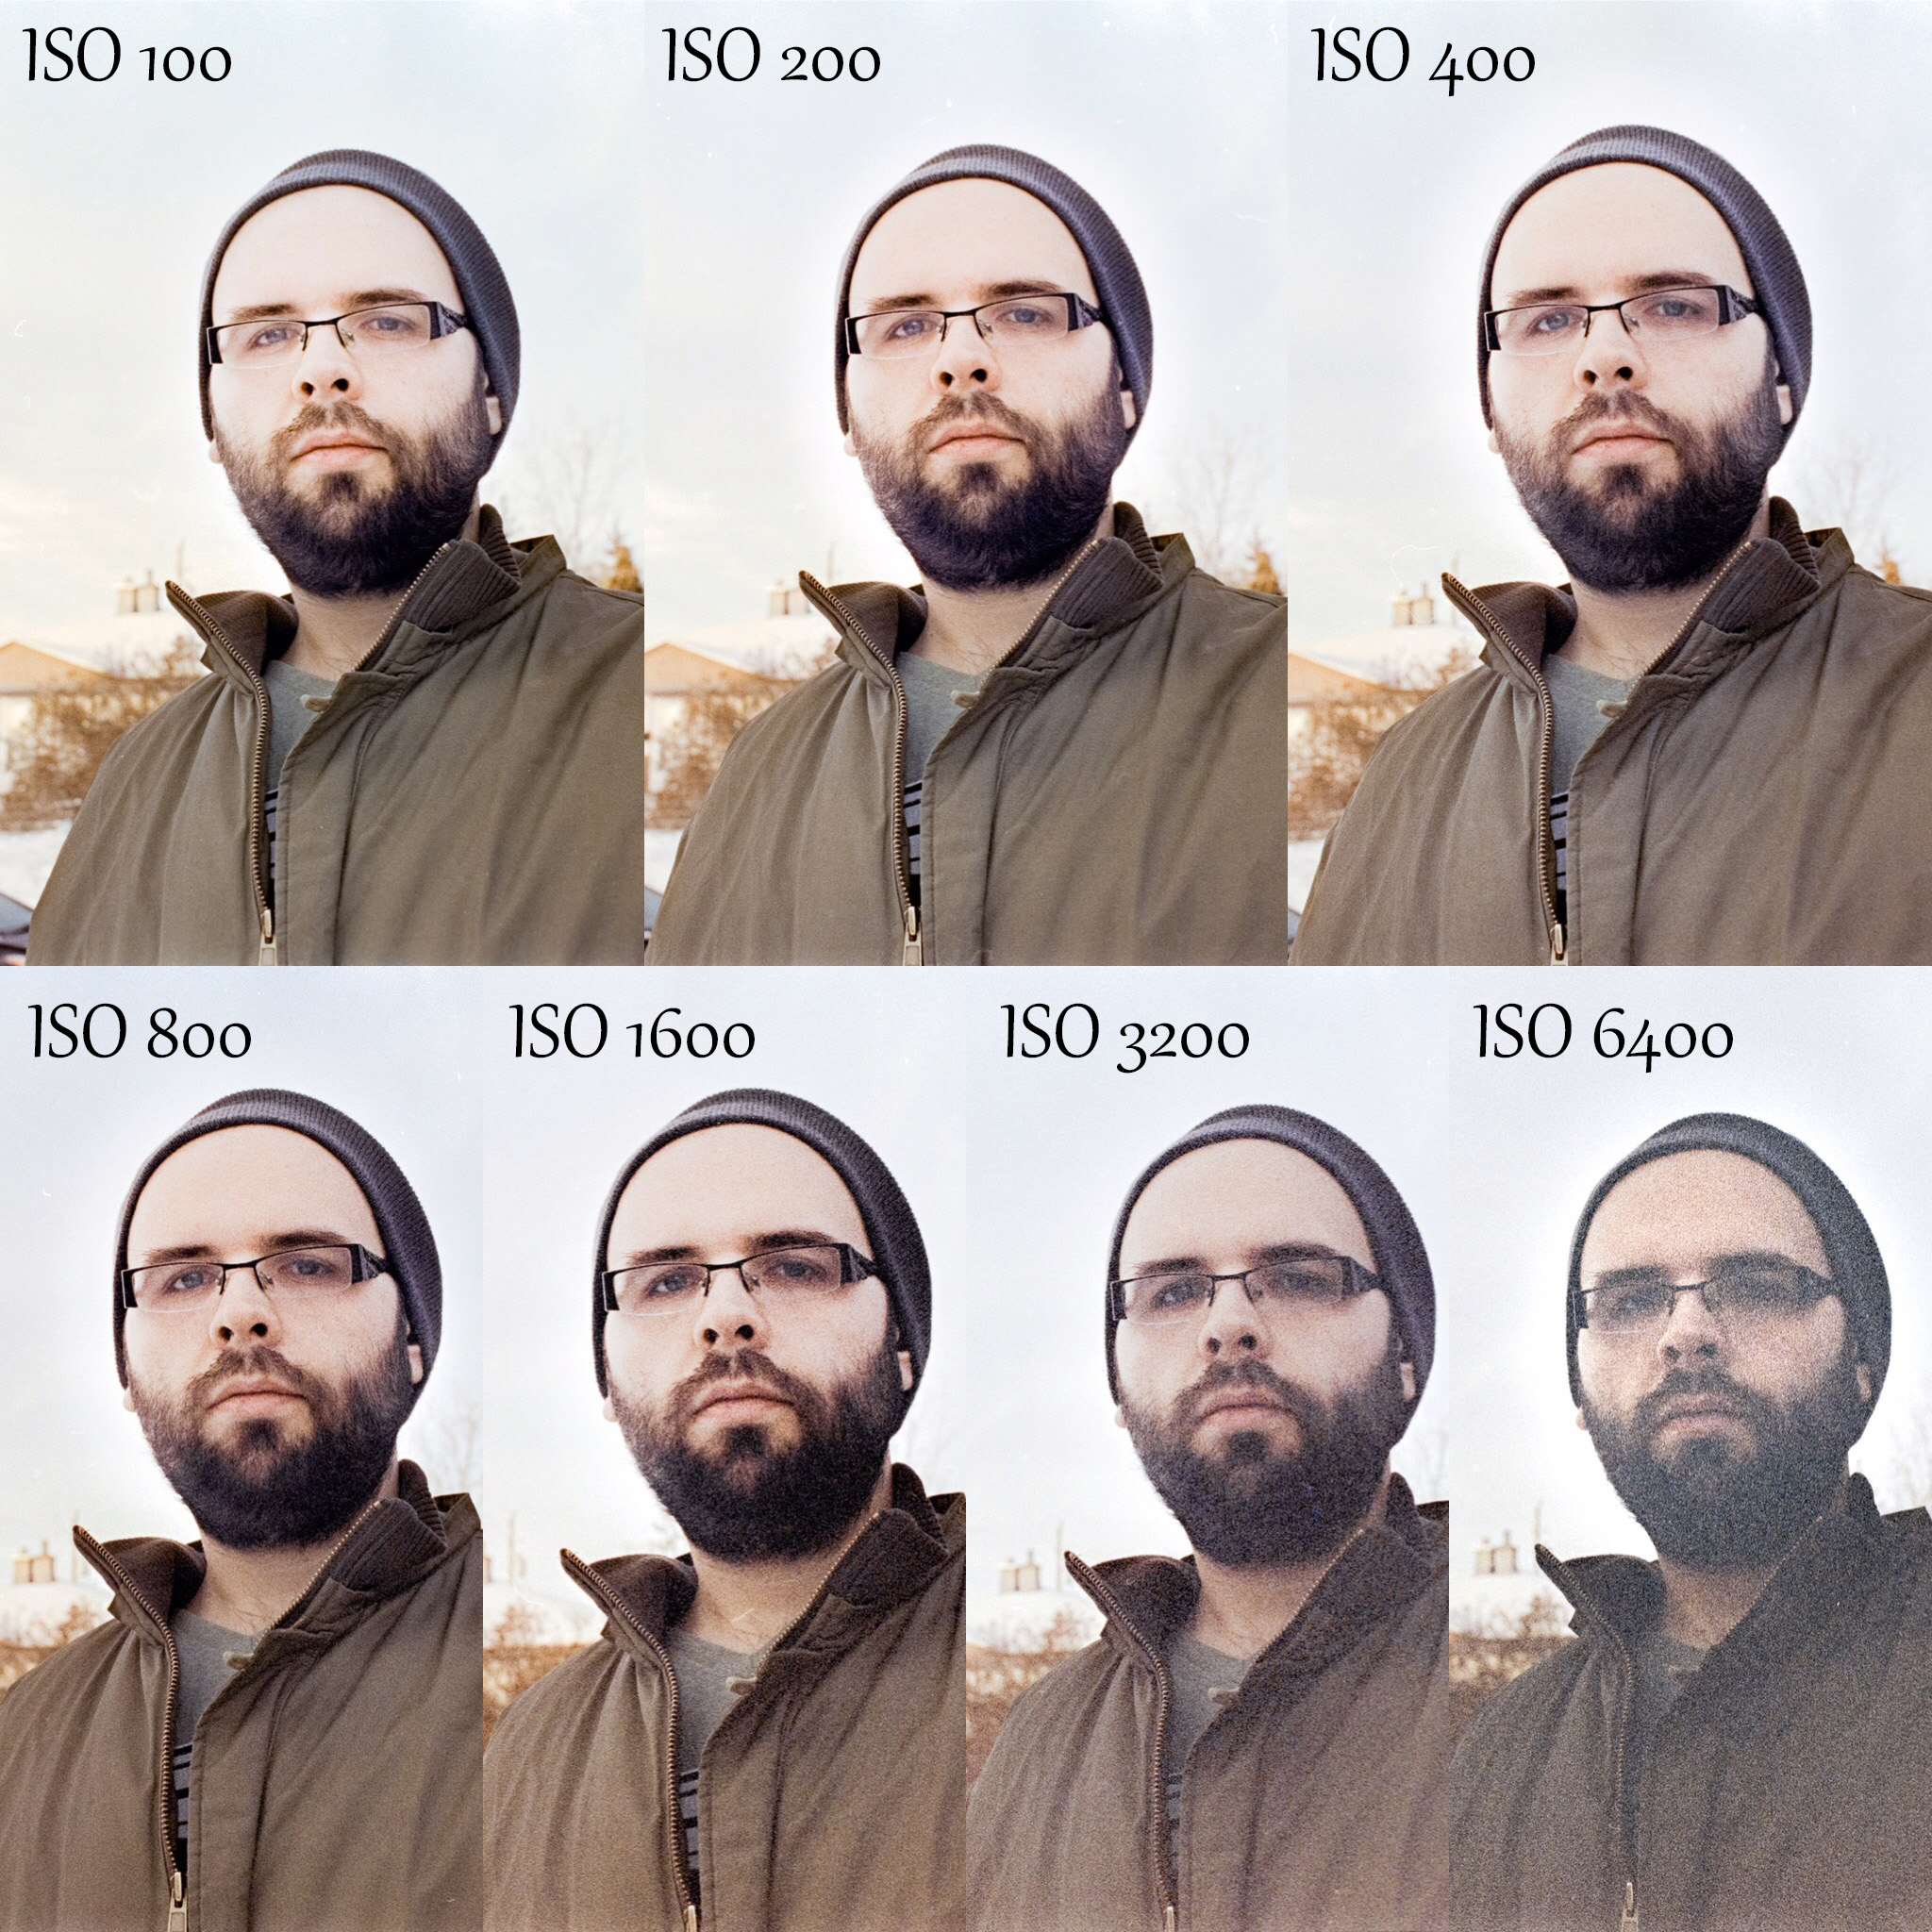
Some observations:
ISO 100 and 200 are gorgeous. If you have the available light to do so, shooting 1-2 stops over is the way to go.
ISO 400 and 800, to my eye, are almost indistinguishable.
ISO 1600 still looks really good! Not quite identical to 800 and below, but pretty close. However, you definitely start to lose a bit of shadow detail. Look in particular at the shadows around my eyes.
ISO 3200 loses a lot of shadow detail. However, it doesn’t look awful. Just not something I’d use except in a real pinch.
ISO 6400, well… it looks bad. However, we’re talking about a 4-stop push, which is damn impressive.
Next I shot an exciting indoor scene. I metered the light next to the bottles of booze, and as before went up in 1-stop increments.

I feel that the results here mostly mirror the ones above. As before, I’d be completely satisfied using ISO 1600 indoors if I needed a higher shutter speed or smaller aperture. But I’d say that ISO 3200 here looks subjectively worse than it does in the shot above. ISO 6400 was very difficult to colour balance.
However, these shots also reveal a white gradient on the left edge of the images. This gradient is mostly gone by ISO 400, and completely gone by ISO 1600. I’m guessing this is a side effect of stand development, because you get a very similar effect doing black & white stand development. In the future, I might try agitating gently every 15 minutes to see if that helps.
Overall, I was really impressed by what I could get out of Fuji Pro 400H, and by the ease of the stand development process.
A few days later, I shot two rolls of Fuji Superia 400 and developed them the same way. (I’m not actually some kind of Fuji shill—this is just the film stock the drugstore next door carries.) I took many normal photos, and also two more sets of bracketed shots.

Aperture priority at ISO 400
Aperture priority at ISO 200
Aperture priority at ISO 400
Above are the normal shots. Note in particular how impressively this film performs even in ugly mall lighting in the last shot.
I figured that pushing consumer film to ISO 6400 might be a little optimistic, so this time I bracketed only up to ISO 3200. I used my camera’s built-in light meter to set the exposure first at ISO 100, and worked my way up from there.
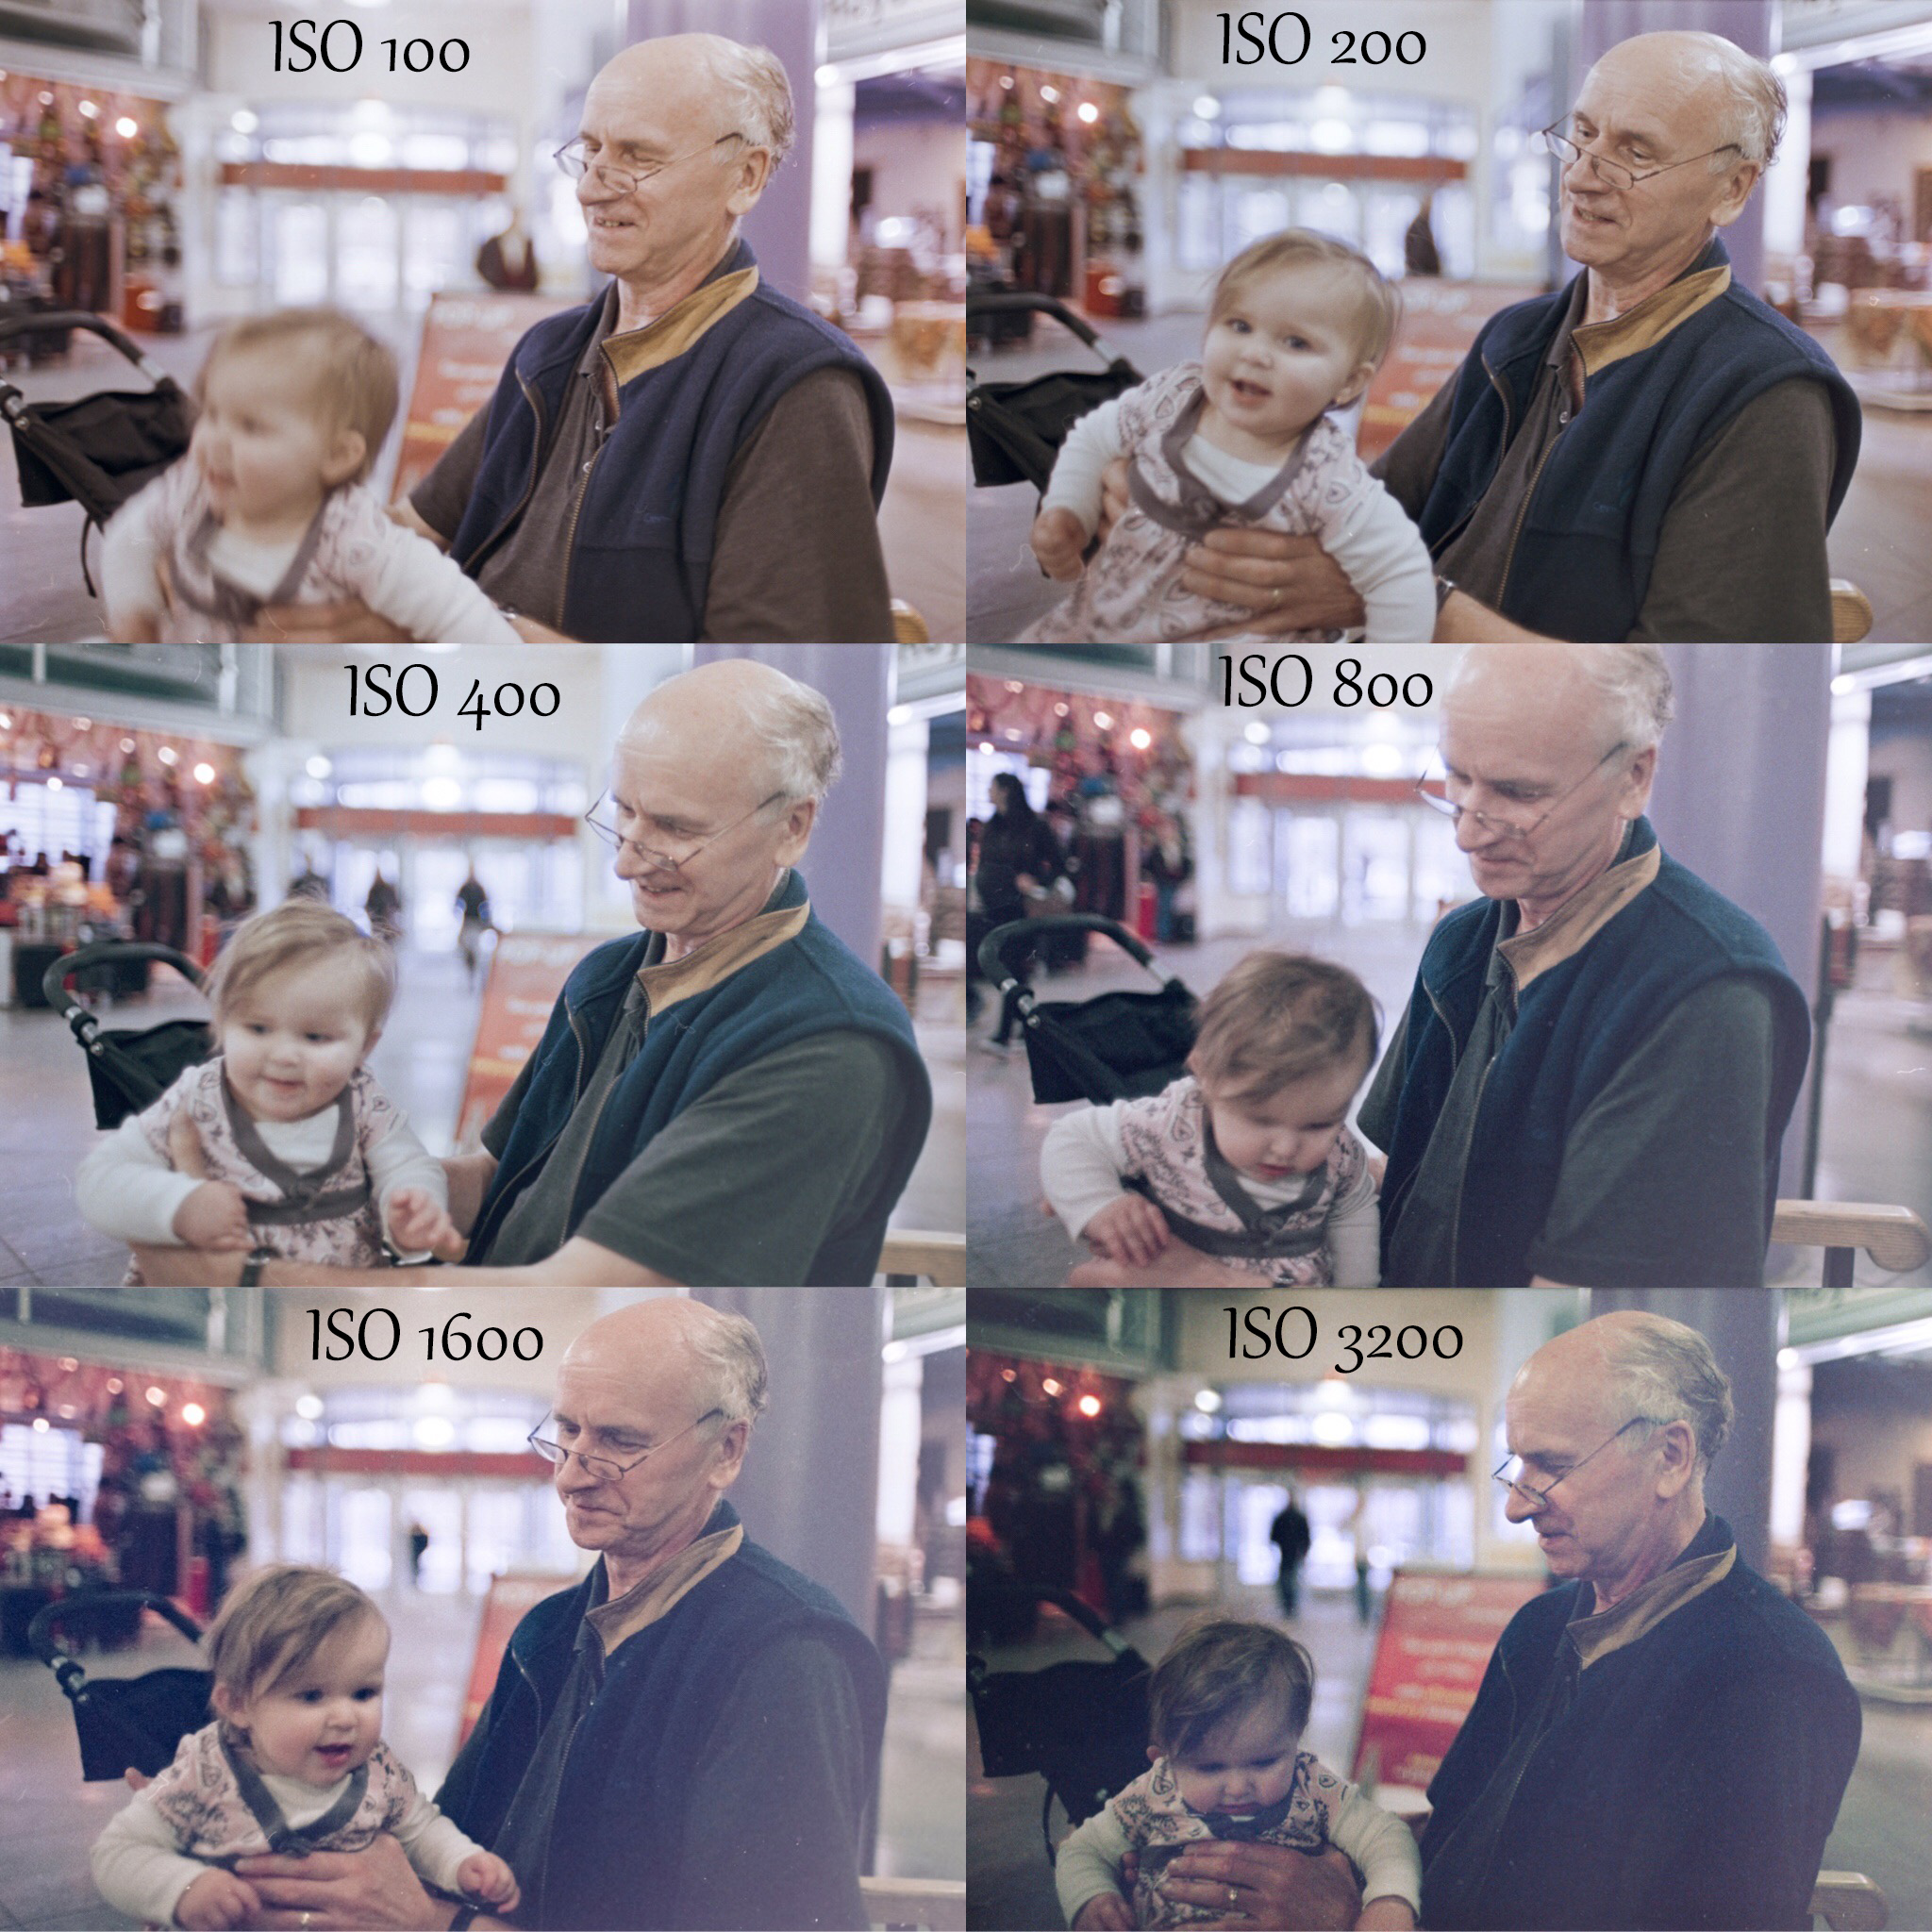
Superia definitely seems to start losing shadow details faster than Pro 400H. (Big surprise.) But I was still pleasantly surprised by how well it held up underexposed. At ISO 1600 it still looks alright, as long as you forget about having lots of shadow details. ISO 3200 is pretty bad, but shockingly not a complete mess.
The second scene was also metered using my camera’s meter.
Here I think even ISO 3200 looks pretty good—a lot better than ISO 3200 in the previous scene. A possible explanation for this: This scene, unlike the previous one, had no extreme backlight, which may have confused the meter and led me to actually underexpose the previous scene.
In my opinion everything up to ISO 1600 looks completely fine for what it is. Which is fantastic for a film stock that’s $3.69 a roll.
I was incredibly impressed by what both Fuji Pro 400H Superia 400 were able to do. More so by the latter, since it’s a third of the price.
Next time we’ll do some Kodak film!
1 Comment